Step-by-Step Guide to Safely Attaching an Action Camera to the DJI Mavic Air 2

Safely attaching an action camera to the DJI Mavic Air 2 can enhance your aerial photography, but it's crucial to understand the right techniques. Through my research, I've discovered methods that won't compromise your drone's performance or safety. Join me as we explore these innovative and reliable attachment strategies.
Is it safe to attach an action camera to a DJI Mavic Air 2? Yes, it is safe when done correctly. Keep reading to learn how to do this without affecting your drone's balance and functionality, ensuring you capture stunning footage while maintaining safety.
Introduction to Attaching Action Cameras to Drones
Drones have revolutionized the way we capture videos and photographs, bringing a new perspective to our creative endeavors. The DJI Mavic Air 2, known for its impressive capabilities, allows enthusiasts to elevate their aerial photography. But, what if you could enhance this experience even further by attaching an action camera? This guide delves into the intricate process of safely attaching an action camera to your DJI Mavic Air 2, ensuring you get the most out of your aerial videography sessions.
Understanding the DJI Mavic Air 2 Features
Before you begin, it's essential to understand the DJI Mavic Air 2's features that are pertinent to attaching an action camera. This drone is not just a flying gadget but a sophisticated tool for creators. For the latest deals and insights on the DJI Mavic Air 2, check out these amazing DJI Mavic Air 2 deals.
Selecting the Right Action Camera
Choosing the right action camera to attach to your DJI Mavic Air 2 is crucial. The camera should be lightweight yet robust, capable of capturing high-quality footage without affecting the drone's balance and flight dynamics. Remember, the key is to maintain the drone's stability for both safety and quality footage.
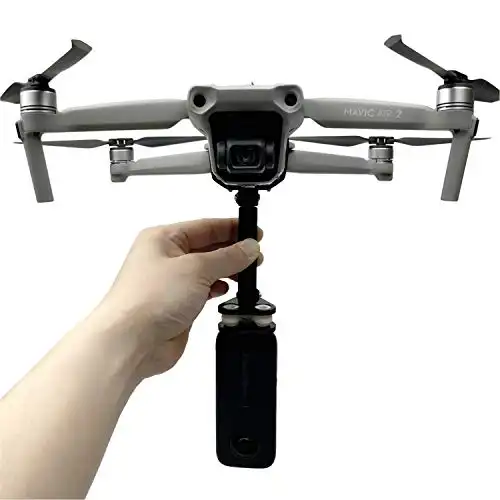
Mounting Options and Accessories
There are several mounting options to consider for attaching an action camera to your DJI Mavic Air 2. Whether you opt for suction mounts, roll bar mounts, or wrist mounts, each has its unique advantages. For instance, suction mounts are ideal for a secure grip on smooth surfaces, while roll bar mounts offer more flexibility in camera angles. When choosing accessories, consider their compatibility with both your drone and the camera. For an in-depth comparison of the DJI Mavic Air 2 and its upgraded version, the Air 2S, visit DJI Air 2S vs Mavic Air 2.
Preparing the Drone and Camera
The first step in attaching your action camera is to prepare both the drone and the camera. Ensure that the camera is charged, and the memory card is inserted – a crucial step for uninterrupted filming. Speaking of memory cards, selecting the right one can significantly impact your recording quality. Find the best microSD cards for your DJI Mavic Air 2 here. Next, securely attach the camera to the mount, ensuring it is fastened tightly to prevent any movement during flight.
In the next part, we'll dive into the testing setup and additional safety measures to ensure a successful and safe aerial filming experience. Stay tuned for more insights and tips to make the most of your DJI Mavic Air 2 and action camera combination.
Testing the Setup and Ensuring Safety
Testing the Setup
Once your action camera is securely attached to your DJI Mavic Air 2, it's time to test the setup. This step is crucial to ensure everything functions correctly before you take to the skies.
- Pre-Flight Inspection: Start with a thorough inspection of the drone and camera. Ensure the camera is securely mounted and check the drone’s propellers for any signs of wear or damage.
- Ground Testing: Power on the drone and the camera while keeping the drone on the ground. Check the camera’s stabilization and ensure it's capturing footage without issues.
- Hover Test: Lift the drone a few feet off the ground and observe the camera’s stability. It’s essential to ensure that the camera remains stable and the footage is clear without any vibrations.
- Flight Maneuvers: Gradually introduce different flight maneuvers. Pay attention to how the action camera performs during these movements. Your goal is to assess the stability of the footage during various maneuvers.
- Review the Footage: After landing, review the footage captured. This will help you understand if any adjustments are needed to the camera’s positioning or settings.
Safety Precautions and Flight Tips
When flying your DJI Mavic Air 2 with an attached action camera, safety should always be your top priority.
- Weight and Balance: Always ensure that the addition of the action camera doesn’t disrupt the drone’s balance. An imbalanced drone can lead to unstable flight and increased risk of accidents.
- Compliance with Regulations: Familiarize yourself with local drone flying regulations. Adherence to these rules is essential for safe and legal operation of your drone.
- Respecting Privacy: Be mindful of privacy concerns when capturing footage in public or private spaces.
Conclusion
Attaching an action camera to your DJI Mavic Air 2 opens up a new realm of aerial photography possibilities. By carefully following these steps and prioritizing safety, you can capture stunning, high-quality footage while ensuring a safe flying experience. Remember, practice makes perfect, so take the time to familiarize yourself with this new setup and explore the creative potential it offers.
In the world of drones and aerial photography, the DJI Mavic Air 2 stands out as a top choice for enthusiasts and professionals alike. By adding an action camera to this powerful drone, you unlock a whole new dimension of visual storytelling.
FAQs
Q: Can any action camera be attached to the DJI Mavic Air 2? A: It's important to use a camera that is compatible in terms of weight and size with the DJI Mavic Air 2 to maintain the drone’s stability and performance.
Q: How do I ensure the camera is securely attached to the drone? A: Use the recommended mounts and ensure all attachments are tightened securely. Regularly check the setup for any loosening or wear and tear.
Q: What should I do if the drone behaves erratically during the flight test? A: Land the drone immediately and recheck the camera's mounting and the drone's balance. Adjust as necessary before attempting another flight.